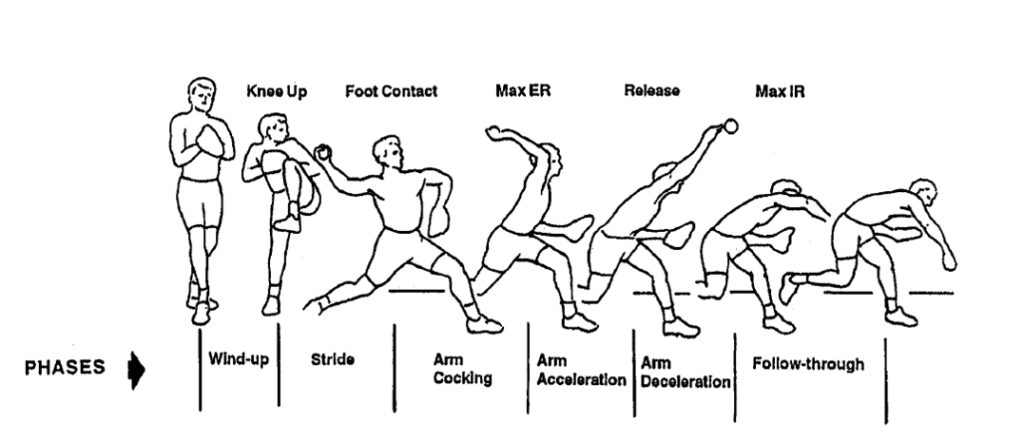
There are 6 phases in overhead pitching cycle. Proper mechanics in each phase can reduce the risk of injury and improve the performance of a pitcher.

The Wind Up Phase
Is defined as the initial movement to maximum knee lift of stride leg. This phase allows the pitcher to load their weight onto the back leg. At maximum knee lift the pitcher should be balance and have good posture with their shoulders over theirs hips and chin over their belt.
The Stride Phase
Begins just after the stride leg reaches maximum knee lift and begins to drive toward the plate. At the same time the pitcher will separate their hands. Early hand separation, at the beginning of stride phase but not before, has been associated with reduced injury and increase power. The stride phase ends with stride foot contact. At this point the stride foot should be slightly turned toward third base for a right handed pitcher, first base for a left handed pitcher, but mostly facing home plate. The stride foot being excessively closed off will cause a pitcher to have to throw across their body putting extra pressure on the throwing arm and effecting accuracy. The stride foot being too open my indicated that the front leg opened early in the stride phase and will cause a loss in throwing power.
The Cocking Phase
Is broken into 2 components. Early cocking actually begins during the stride phase and late cocking beginning when the stride foot makes contact with the ground. At this point the throwing arm should be abducted to about 90 degrees, horizontally abducted about 30 degrees, and externally rotated about 60 degrees. Late cocking begins from the point stride leg contacts the ground to the point of maximum external rotation of throwing arm. During this phase the pelvis reaches its maximum rotation and upper torso continues to rotate and tilt forward and laterally.
The Arm Acceleration Phase
Begins at maximum shoulder external rotation and ends at ball release. The body from the trail leg to the hand in max external rotation will demonstrate a reverse “C” position. A strong core, strong scapular stabilizers, and thoracic mobility are important in the phase.
The Arm Deceleration Phase
Begins at ball release and ends at maximum shoulder internal rotation. The rotator cuff works eccentrically to slow down the momentum of the arm moving forward. The head should veer to the glove side after ball release allowing the throwing arm to continue on it path and avoiding cutting off the throw too soon.
The Follow-Through
Is the phase where the body continues to move forward until the arm has ceased motion. The pitcher should finish over a flexed but stable front knee and the trunk rotates around to assume a fielding position.
For an individual assessment of your pitching mechanics and specific drills to make your mechanics more effective and to reduce the risk of injury contact one of our throwing experts today.

